Testing and maintaining your sump pump is one of the most important seasonal plumbing tasks for Canadian homeowners. A quick check before spring thaw or heavy rain can prevent basement flooding, mould, and thousands of dollars in damage.
Why Sump Pump Testing Matters
- Flood prevention: A working pump protects basements during heavy rain or rapid snowmelt.
- Insurance: Many Canadian insurance providers require proof of maintenance to honour flood damage claims.
- Longevity: Routine upkeep extends pump life by years.
- Peace of mind: Knowing your sump pump will work when you need it most.
Local note: Canadian regions with heavy rainfall (BC coast), rapid snowmelt (Prairies, Ontario, Quebec), or high water tables are most prone to sump pump failures.
Signs Your Pump Needs Service
- Runs but doesn’t discharge water.
- Starts and stops too often (short-cycling).
- Hums, grinds, or makes unusual noises.
- Strong odour or visible mould around pit.
- Hasn’t been tested in more than 6 months.
When Not to Test Yourself
DIY testing is safe in most cases, but call a plumber if:
- Electrical cords are frayed or damaged.
- The pit water is oily or contaminated.
- The pump hasn’t been serviced in over 5 years.
👉 Attempting to run or repair in these conditions could be unsafe.
⚠️ Safety Disclaimer
Working around sump pits is hazardous and can be fatal if safety rules are ignored.
- Confined spaces: Sump pits may contain low oxygen levels or harmful gases. Air is vital for human life. Never climb into or lean deep inside a confined pit.
- Life-saving equipment: Entering a confined space requires a tripod, a full safety harness, and continuous air monitoring. Only trained professionals should attempt this work.
- Never work alone: Always have another adult present to assist or call for help in an emergency.
- Open pit hazards: An uncovered sump pit is a fall and drowning hazard. Replace the cover immediately after testing or cleaning.
- Electrical risks: Water and electricity are a deadly combination. Always unplug the pump or switch off the breaker before working near water.
- Protective gear: Wear gloves, safety glasses, non-slip footwear, and a respirator if working near stagnant or foul water.
👉 If you do not have the proper safety training and equipment, do not enter or attempt to service a confined space. Stop immediately and call a licensed plumber.

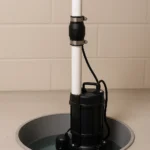
How to Test a Sump Pump
Tools & Equipment
- 1 Bucket
- 1 Flashlight
- 1 Gloves and safety glasses
- 1 Small brush or cloth
Parts & Supplies
- $5 1 Mild cleaner (vinegar solution works well)
- $40-90 1 Replacement check valve (optional if the current one fails)
Instructions
- Safety firstUnplug the sump pump or turn off the breaker before starting. This prevents electrical shock while you’re working near water. Always wear gloves and safety glasses.⚠️ Danger: Never reach into the pit while the pump is plugged in. Electricity and water together can be deadly.

- Inspect the float switchLook inside the pit and gently lift or move the float. It should move freely up and down without getting caught. The float switch is what triggers the pump.⚠️ Stop here if the float is stuck, broken, or tangled — forcing it can damage the mechanism. Call a plumber if it won’t move.

- Check the power sourcePlug the pump into a GFCI-protected outlet and make sure the cord is in good condition. If you have a battery backup, confirm it’s fully charged.⚠️ Danger: If the cord is cracked, frayed, or warm to the touch, don’t use the pump — it’s an electrical hazard.

- Add water to the pitFill a clean bucket with water and slowly pour it into the sump pit until the float rises. Watch for the pump to turn on within seconds.⚠️ Stop if the pump hums but doesn’t discharge water. This could mean the impeller is jammed or the motor is failing.

- Confirm the pump is dischargingStand beside the sump pit while the pump is running. Watch the water level in the pit — it should drop steadily as the pump activates. At the same time, listen for the sound of water moving through the discharge pipe. You should hear the check valve click or open as water passes through, followed by the whoosh of water flowing in the pipe.⚠️ Stop if the water level does not go down or if you hear only humming with no water movement. This may mean the impeller is jammed, the discharge line is blocked, or the pump has failed. Call a plumber immediately.Note: In most Canadian cities, sump pumps discharge into the storm sewer system. In rural areas, they may discharge to a yard or drainage ditch.

- Confirm the shutoffWhen the pit empties, the float should drop back down and the pump should shut off smoothly. This shows the switch is working both ways.⚠️ Stop if the pump keeps running nonstop. That usually means a float switch or check valve problem, and it risks burning out the motor.

- Clean the pit and pumpOnce the test cycle is complete, unplug the pump again. Use a small brush or cloth to clean the pump’s inlet screen and clear out any debris, sludge, or gravel from the pit. Most residential sump pumps are submersible, so rinsing them with clean water will not hurt them — in fact, a good wash helps keep the impeller and screen clear.⚠️ Important: If your sump pit is very deep, large, or has heavy buildup, do not attempt to clean it yourself. Deep pits can be dangerous confined spaces and may require a professional crew with a vacuum truck to remove the material safely.👉 Always replace the pit cover after cleaning to prevent falls or new debris from entering.

- Inspect the check valveLocate the check valve on the discharge pipe, usually just above the sump pit. The check valve prevents water from flowing back into the pit after the pump shuts off.Basic test (all homeowners): After a pump cycle, listen for the valve to click shut and confirm that the pit water level does not rise again. If you hear gurgling or see the water level return, the valve may be failing.Visual inspection (only if installed to code with a union fitting): Some sump systems include a union fitting above the pit that allows the pipe to be disconnected safely. With this setup, you can remove the valve for inspection and cleaning.Stop if you see heavy backflow or cannot disconnect the valve safely. A faulty or inaccessible check valve should be serviced by a licensed plumber.⚠️ Important: Many Canadian cities require sump pump installations to follow plumbing code, which includes a union fitting for service. If your system does not have one, do not attempt to cut or remove the pipe yourself, call a plumber.

- Restore power and retestPlug the pump back in and run one more bucket test to make sure everything works smoothly after cleaning.⚠️ Danger: Don’t leave the pit cover off — an open pit is a fall hazard and allows debris to enter.

Notes
- Always reconnect to a GFCI outlet.
- Test more often in flood-prone or high water table areas.
- Document test dates for insurance purposes.
Pro Tips
💡 Test your sump pump before the rainy season or spring thaw.
💡 Install a battery backup if your area experiences frequent power outages.
💡 Keep a spare check valve — they often fail before the pump itself.
💡 In cold provinces, remove or insulate discharge extensions to prevent freezing.
💡 Add sump pump testing to your seasonal maintenance calendar.
Cost Estimates
- DIY testing: Free (just a bucket of water).
- Professional service: From $300 minimum service charge in most Canadian cities.
- Replacement pump: $900–$1,800 installed (basic submersible).
- Battery backup system: $800–$4,000 depending on capacity.
Estimates exclude after-hours service, permits, or specialized parts.
Professional vs. DIY
DIY sump pump testing is simple and safe for most homeowners.
Hire a plumber if:
- Pump doesn’t activate during the test.
- Float is stuck, broken, or unresponsive.
- Check valve leaks or water flows back.
- Motor overheats or trips breaker.
- Pump is 10+ years old or undersized for your home.
Common Mistakes to Avoid
- Forgetting to unplug before cleaning.
- Pouring dirty or oily water into the pit.
- Ignoring outdoor discharge blockages.
- Assuming “quiet” means “working.” Always test with water.
- Not moving the float freely before testing.
Maintenance Calendar
- Test sump pump: every 3–6 months.
- Clean pit and inlet: annually.
- Replace check valve: every 2–3 years.
- Replace pump: every 7–10 years.
- Check backup system: annually.
FAQs
How long does testing take?
Usually under 15 minutes, including cleanup.
Do I need to use chemicals?
No. Clean water and mild vinegar solution are enough.
What if the pump runs constantly?
Likely a float switch or check valve issue. Call a plumber.
Should I remove my discharge extension in winter?
Yes — it can freeze and block water flow.
How do I know if my pump is too old?
If it’s more than 10 years old, consider replacement even if it still works.
Real-World Example
A homeowner in Ottawa tested their sump pump before spring melt. The pump hummed but no water discharged. A plumber found the impeller jammed with gravel and the check valve leaking. Both were replaced, restoring full operation. The repair cost $480 and prevented what could have been a $15,000 flooded basement.
Next Steps
Finished testing your sump pump? Add a reminder to your calendar to repeat in 3–6 months.
👉 If your pump doesn’t run, cycles too often, or shows signs of failure, book a licensed plumber at unclogit.com or call 604-496-1661. Usually available 24/7 across Canada.